Dear Friend,
In an effort to document the inner working of the new Beta templating system, I will try to explain to you in slightly-above everyday language how it works. In my opinion, the new templating system is more straight-forward than the classic one, in that it uses simple logic such as the b:if and the b:loop; but more importantly, it allows the seamlessly mixing of code between Beta and JavaScript, thus provides new possibilities in generating interesting templates.
I assume my target audience has only the very basic knowledge of the code of a simple HTML, and some very basic knowledge of what is an if statement, or a loop statement, in general (I will review what it means though, so don't be scared.) If you know a little bit about CSS, that's great too, but it is not required - since I don't know much either, aside from some simple tweakings of existing CSS code.
1. How Things Work
I remember the first time I ever wrote a simple HTML file. It's really nice to see that you can write something on the body part, and it shows/renders on the page right away. If I put a pair of <b> and </b> around that text, it becomes a bold text, and so on. Then, as I create more and more documents, I have to make links for the user to click on them to jump to other articles.
The problem is, every time I create a new file, I have to go back to every single of my existing files to add a link to this new file. Not only that, if I want to change my site's visual look, I have to edit all these files without exception. You could imagine how chaotic and inconsistent of these files' code after a while.
Templating system to the rescue! Imagine that you have a file that would take care of all the nitty-gritty of maintaining links to all the posts, yet powerful enough so that a simple change to this file such as the site's title would update all the files to appear with the same new look. Well, Blogger Classic did just that, and its users are quite happy with this templating design, along with its free hosting service. (Didn't Blogger just celelebrate its seven-years-in-existence a month ago?)
To be fair, Blogger is probrably not the first nor the only solution out there that offers its users this kind of templating. But along with the new Blogger Beta, the much anticipated templating design does follow Goggle's simplicity trademark by providing a more simple, XML (almost)-compliant version, yet flexible enough that you can extend its functionalities by allowing integration with JavaScript.
2. Beta's template is a HTML file
Let us now looking at Blogger's Beta template by unfolding one layer at a time its very basic structure. To so this, I save one of its design to my desktop, then drag it onto Internet Explorer, and click on the minus (-) red symbols at the front of several div tags until I reach this basic level as seen below,

I will not go into details here but will only touch on the basic facts. First of all, this is a XHTML file. It has the xml tag at its very fisrt line, with an encoding parameter UTF-8. This is very important, it means I can store both ASCII (western) characters, as well as other unicode characters such as Vietnamese one. This is great, because it allows me to target two audiences while sharing the same internal working and filing system.
As with any HTML file, our template has a head section, and a body section. The head part is for showing the file's title, storing the CSS code, and some common scripting functions, if any. The body is for storing instructions on how to display/undisplay widget elements, as we shall review next.
One important fact to point out is, even at this high-level design, as with any well thought-out system, we have already seen a basic software engineering design of "separating of concerns." Indeed, the CSS part - controlling the look of the site, is separated from the logical code in the body part. The body should not have any instructions on how to layout the visual look of the webpage.
Because this is a XHTML file, users whom are familiar with HTML know right away on how to use HTMl tags. More important, if you're not follow the HTML rules, your website will not work at all! This XHTML compliant feature gives a strong clue on how to make the template runs indeed. It's either worked or not worked, and nothing in between.
3. The head section
As noted above, the head has nothing more than the title's name, CSS instructions, and some JavaScript functions.

Based on Beta's online Help, a b:include tag allows us to run something with the function named all-head-content. My best guess is that, after this line, you can start to access global variables such as the homepage's blog name, its url, and some other common data, as specified in the Layout's Data Tags online document.
Indeed, the title uses the blog's page title for showing in the upper left corner of the viewer's browser.
<title>
<data:blog.pageTitle />
</title>
Inside the skin tag, there are CSS instructions, as well-documented in the help article entitled Fonts and Colors Tags for Layouts
If you wish to add JavaScript code, then put them right before the </head> tag. You probably have seen some (if not most) of my hacks use this appending approach.
As for the body section, there are so much to discuss about, indeed. In my next article, I will start to peel off and discuss each layer of the body section at a time. Stay tune.
Cheers,
Hoctro (9/26/2006)
Blog: http://hoctro.blogspot.com/
***************
Dear Friend,
Following what have been left off from the first article in the series, this time I will talk about the body section. As you will see, the beta template contains both ordinary HTML tags such as <div> and <span> and special tags of its own such as <b:includable> or <b:if>. But first, a little explanation on an important XML/XHTML rule.
Nowadays, the two acronyms HTML and XHTML mean almost the same thing: a tagged document that can be shown on any modern browser such as Firefox or IE6. But the "X" in front of "HTML" means that this is a well-formed XML document. What does this means? It means that the tags are (almost) always come in the form of a pair of tags, an opening one, and a closing one. For example, this is a correct XML pair: <div> and </div>. The backlash "/" in front of a tag always represents the equivalent closing tag. Usually, in between these two tags, there are either texts or more well-formed tags.
In some cases where the tag is self-sufficient, a "/" is always added at the end, right before the > sign. An example would be the new-line tag: <br />
Since the new beta template is a well-formed document as declared by its very first line:
<?xml version="1.0" encoding="UTF-8" ?>
the template must obey the well-formed characteristic of an XML document. This is both a good thing and not-so-convenient thing. The good thing is that being a well-formed document, it is going to be much easier for desktop or web programs to be able to read in and process data in an expected manner, using shared and/or open source parser programs. The bad thing is, amateur web coders will have much tougher time trying to write/hack a decent program and not missing a > sign, a closing tag, or mixing tags together in an unorder fashion.
But enough of XML definitions. Let us take a look at what is inside the next level down of the body tag.
Div Tags, more div tags, and some more div tags
After clicking on the pluses and minuses while opening the template inside IE6 for a while, this is what I have:

If you try to ignore the "div" tags and some other minor tags, but concentrate on the ids, you will see that the body section is made up of these main components:
*outer-wrapper
---header-wrapper
---content-wrapper
......main-wrapper
......sidebar-wrapper
---footer-wrapper
Basically, what we have is a header section, a content section composed of a main and a sidebar, and a footer section. Sound familiar? Have you seen this layout visually before? Of course you did!
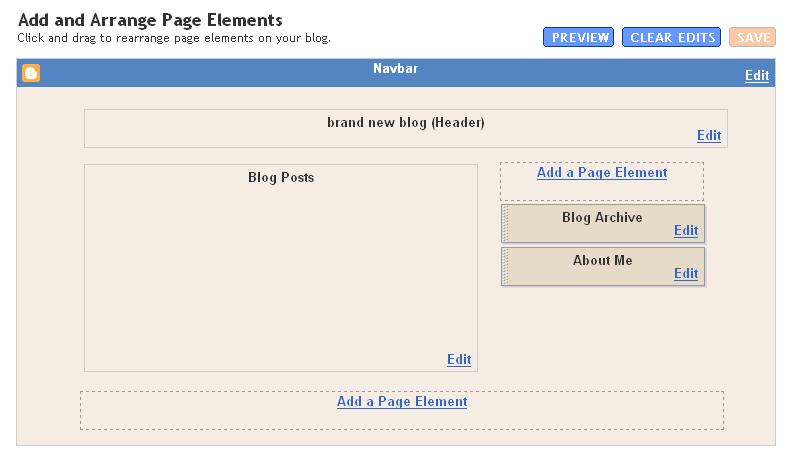
As you can see, the Page Element follows very closely, and in fact it is the visual representation of the textual template!
Knowing this one-to-one relationship, now you can start to understand why and how a three-column template can be made: by adding a new sidebar-wrapper div to the content-wrapper section. The same concept apply if you want a 4 or 5 column template.
Here is the link to my own solution illustrating how to quickly add a new column. This solution is never added to my official hacks, since my friend Ramani has already found out how to do it far earlier time than I did and publish also the solution on his site.
What's next
But wait a minute! Where are the two rectangulars (Blog Archived and About Me) represented textually inside the template, you ask?
It's there, of course, just one level down.

These beta tags will be our focus point of the next article.
Have a wonderful day and see you next time.
Hoctro (9/28/2006)
Blog: http://hoctro.blogspot.com/
*************
Dear Friend,
Continuing on our quest of understanding the new Blogger in Beta template upside down, inside and out, top-down approach, and so on :-) this time we will take a closer look at how Blogger's data could be seamlessly embedded inside regular HTML tags, and as a consequence, proving that any exiting CSS blogging template could be retooled to work with the new Beta template system.
Here is the picture I showed you at the end of the previous article,
We've got that far without revealing any blogger tags. Using the same technique of hiding and displaying the div, this time I uncover the next level. I also added all possible widgets that Blogger offers. Here is the result,

It looks kind of more complex, but still understandable somewhat, right? Underneath each of the "xxxx-wrapper" tags, there is one b:section tag. Under each of this special tag, there are one or more of the widget tags, each with its own identification and other things. Now if I click on the + sign of each widget, I will get to see the actual beta coding for this widget. But those internal code would be the subjects of many follow-up articles. The scope of this article is therefore limited to only discussing about the two levels that i've just mentioned, namely b:section and b:widget.
The equivalent visual representation of the code I just show you would be like this,

and when you view the blog in action, it would look like this,

Next, let us discuss about each section - the header, the main post area, the sidebar, and the footer - in details.
1. The Header Section
In this section, we know that it has to somehow show the title and the description of the blog. Because there is only one widget, those info must reside in it. But first, there are also other information and/or settings as part the header section,
<div id='header-wrapper'>
<b:section class='header' id='header' maxwidgets='1' showaddelement='no'>
<b:widget id='Header1' locked='true' title='brand new blog (Header)' type='Header'/>
</b:section>
</div>
We see that a section has a class, and we have four classes representing four sections. They are the header, the main, the sidebar, and the footer classes. (Also, according to Blogger, at runtime each b:section will become a div, so you could use your CSS markup to enhance the look of those.) The section also has its own id, namely "header". The parameter maxwidgets="1" signifies that there is only one widget that could be added to this section. The parameter showaddelement="no" means that you will not see a "Add a Page Element" box in this section. (Why need it when you already set the max widget to be of one widget only?)
Inside the b:section, there is only one widget, with the id of "Header1". The parameter locked="true" means that you cannot drag this widget to anywhere else. The title on the widget to be shown in the box of the layout (and not our real web page) was the next parameter, while the last parameter tells Blogger this is a header type.
We will explore the contents of this widget in another article.
2. The Main Section
The Main section obviously is for displaying the contents of a page. This varies drastically, from one post only to possibly every posts in the blog. Even for the "one item" case, there are a lot of information to display, such as the time created, the title of the post, the contents, all the comments for the post, backlinks, navigation system, etc. In the "Expand Template" view, the portion of the code is about 80% (not counting CSS code)! This section probably is the one that scares off people from looking into tweaking the template to suit their sites. But it doesn't have to be that way. One could just ignore the section and only revisit it when they feel more confident.
Below is the code for the section in simplified form,
<div id='main-wrapper'>
<b:section class='main' id='main' showaddelement='no'>
<b:widget id='Blog1' locked='true' title='Blog Posts' type='Blog'/>
</b:section>
</div>
As you can see, under the (id = ) main section, there is only one widget named Blog1, with other minor parameters similar to the Header section.
3. The Sidebar section
Hopefully, by now you are already feel at home with identifying where is the section tag and all the widget tags it contains. I purposedly attach every single Page Element that Blogger offers with the "Add Page Element" option to show you the syntax of each widget. As you can see, the parameters are pretty much self-explanatory, as one can easily guess which widget corresponds to which line of code. If you happen to want two widgets of the same type, just make sure they have unique IDs, such as Label1 and Label2, and you will be fine.
<div id='sidebar-wrapper'>
<b:section class='sidebar' id='sidebar' preferred='yes'>
<b:widget id='BloggerButton1' locked='false' title='' type='BloggerButton'/>
<b:widget id='Label1' locked='false' title='Labels' type='Label'/>
<b:widget id='Feed1' locked='false' title='Hoctro"s Place' type='Feed'/>
<b:widget id='HTML1' locked='false' title='html code' type='HTML'/>
<b:widget id='Text1' locked='false' title='a text' type='Text'/>
<b:widget id='Image1' locked='false' title='pic' type='Image'/>
<b:widget id='LinkList1' locked='false' title='link list' type='LinkList'/>
<b:widget id='TextList1' locked='false' title='list' type='TextList'/>
<b:widget id='BlogArchive1' locked='false' title='Blog Archive' type='BlogArchive'/>
<b:widget id='Profile1' locked='false' title='About Me' type='Profile'/>
</b:section>
</div>
Again, I will get into details of these widgets one by one, hopefully in the next article.
4. The Footer section
There is no special about this section at all, except for the fact that when the section has no widget, it appears in just one line, like so <b:section .... />
<div id='footer-wrapper'>
<b:section class='footer' id='footer'/>
</div>
5. What makes it so great about Beta Templates?
We are at the end of our little trip of visiting the sections and widgets at their simplest form. The great thing about the code I've just shown you is that it's not there for nothing, it actually works. Indeed, if you have any new template with this kind of simplified Blogger code, then cut-and-paste that code into the HTML Edit window and save it, it would show you a blog, however simple or complex you want it to be.
This fact is very important if you want to start creating customized beta templates for yourself and for others. You don't have to cut-and-paste the long form and try to fit it in a well-designed, existing HTML design. You can simply embed the internal (whatever inside and including of the two b:section tags) of the four sections I described above to the proper locations in your design, and your blogger data will magically show up! Only then, you start to tweak your CSS design to match the divs' names of the Blogger sections for the text to show correctly.
I will prove this point to you right away.
First, create a new test blog, then go to Template->Edit HTML. Save your current design to your desktop, then cut and paste this code below,
<?xml version="1.0" encoding="UTF-8" ?>
<!DOCTYPE html PUBLIC "-//W3C//DTD XHTML 1.0 Strict//EN" "http://www.w3.org/TR/xhtml1/DTD/xhtml1-strict.dtd">
<html xmlns='http://www.w3.org/1999/xhtml' xmlns:b='http://www.google.com/2005/gml/b' xmlns:data='http://www.google.com/2005/gml/data' xmlns:expr='http://www.google.com/2005/gml/expr'>
<head>
<b:include data='blog' name='all-head-content'/>
<title><data:blog.pageTitle/></title>
<b:skin><![CDATA[
/* Variable definitions
====================
<Variable name="bgcolor" description="Page Background Color"
type="color" default="#fff" value="#ffffff">
<Variable name="textcolor" description="Text Color"
type="color" default="#333" value="#333333">
*/
body {
background:$bgcolor;
margin:0;
color:$textcolor;
font:x-small Georgia Serif;
font-size/* */:/**/small;
font-size: /**/small;
text-align: center;
}
]]></b:skin>
</head>
<body>
<div id='outer-wrapper'><div id='wrap2'>
<!-- skip links for text browsers -->
<span id='skiplinks' style='display:none;'>
<a href='#main'>skip to main </a> |
<a href='#sidebar'>skip to sidebar</a>
</span>
<div id='header-wrapper'>
<b:section class='header' id='header' maxwidgets='1' showaddelement='no'>
<b:widget id='Header1' locked='true' title='brand new blog (Header)' type='Header'/>
</b:section>
</div>
<div id='content-wrapper'>
<div id='main-wrapper'>
<b:section class='main' id='main' showaddelement='no'>
<b:widget id='Blog1' locked='true' title='Blog Posts' type='Blog'/>
</b:section>
</div>
<div id='sidebar-wrapper'>
<b:section class='sidebar' id='sidebar' preferred='yes'>
<b:widget id='BloggerButton1' locked='false' title='' type='BloggerButton'/>
<b:widget id='Label1' locked='false' title='Labels' type='Label'/>
<b:widget id='Feed1' locked='false' title='Hoctro"s Place' type='Feed'/>
<b:widget id='HTML1' locked='false' title='html code' type='HTML'/>
<b:widget id='Text1' locked='false' title='a text' type='Text'/>
<b:widget id='Image1' locked='false' title='pic' type='Image'/>
<b:widget id='LinkList1' locked='false' title='link list' type='LinkList'/>
<b:widget id='TextList1' locked='false' title='list' type='TextList'/>
<b:widget id='BlogArchive1' locked='false' title='Blog Archive' type='BlogArchive'/>
<b:widget id='Profile1' locked='false' title='About Me' type='Profile'/>
</b:section>
</div>
<!-- spacer for skins that want sidebar and main to be the same height-->
<div class='clear'> </div>
</div> <!-- end content-wrapper -->
<div id='footer-wrapper'>
<b:section class='footer' id='footer'/>
</div>
</div></div> <!-- end outer-wrapper -->
</body>
</html>
Here is what you will probably see after saving the template and view the result,

There are two things that are worth mentioning here:
1.If you follow my three articles in the "Understanding Beta Template" series closely, and if you ignore the CSS part (between the b:skin tags), you should be able to understand 100% the body section of the template! It's fairly identical to what I've been explaining to you in term of the meaning of the header, main, sidebar, and footer sections.
2. In the head section, I keep two variables and the CSS commands for the body tag. You could even carefully leave this part out and the template would still work. My point is the Blogger contents do exist independently from their presentation counterparts.
6. The Road Ahead
There are actually two roads ahead of us! For the ones who have artistic minds, you can apply what we have been discussing and create your own templates for your own use, and hopefully for others to use (for free, I might insist :-) as well. A great place to start is at the Open Source Web Design homepage.
The other road to explore would be to "hack" the inside of the widgets. And of course this is fun too, I might add :-)
Have a wonderful day and see you next time.
Hoctro (10/2006)
Blog: http://hoctro.blogspot.com/