Dear Friend,
It was only last week that I was introduced to Hackosphere from Buzz. Ramani showed me a new hacking utopia where one can hack Blogger 3.0 to his or her heart's content. He explained every single one of his hacks to us, in great details, yet still somewhat kept a "secret" (at least for me under my tired eyes from hacking Beta for a week now that I couldn't see straight ;-) - that a week later, after much soul (and google) searching, I found it not too far away but in his treasure chest, once again - the missing piece that glued everything together: how to program Beta with JavaScript. Yes, he kept his "secret" under a link, but once I found out, I can see a truly new world of hacking possibilities.
You see, Blogger Beta provides a way to retrieve a piece of data or a collection of data, along with a (mysterious at first) function-definition and function-call system, the primitive if-then-else expression and the irreplaceable loop command. But, with only those few limited tools, one can only hack so much. What we need is a complete language with variables, array, other kind of loops and logic expressions, to name a few. I guess I kind of know all along that JavaScript is the One, but how to do it in Beta's template is a different matter.
The code Ramani presented us opened up all sorts of interesting things. He showed that we can compare an integer to another, how to declare a variable then assign a Beta piece of data to it, and how to append those data to show in an id using the innerHTML method. It's not that I have not done similar things like that before, it's just that I thought that if Beta is so XML-compliant (it needs the "CDATA" to wrap around CSS instructions, for example ), maybe coding JavaScript the regular way wouldn't work.
Well, his hack works, and so does his JavaScript embedding style.
Based on his success, I was able to write a live demonstration showing the seven different ways to display your homepage by just clicking on a different icon.

Below is the stripped down version of it, showing how to code a printer-friendly vesion on a webpage.
Installation:
To install this hack, follow all the steps from my previous hack. Then, create a fake HTML element. Once this is done, drag it to the bottom bar. Then look for the code near the end of the expanded version of the template. Replace the HTMLX widget with the code below, making sure to fix the id so it would match the id of the template.
<!-- Printer Friendly Hack 9/14/06 - Need to install Yahoo! Grid CSS hack first from here:
http://hoctro.blogspot.com/2006/09/tweaking-new-blogger-yahoo-ui-librarys.html
-->
<b:widget id='HTML3' locked='false' title='' type='HTML'>
<b:includable id='main'>
<div class='printer-friendly'>
<a href='javascript:void' onclick='javascript:changeStyle("yui-t6");' title='yui-t7'>Back to normal</a> ***
<a href='javascript:void' onclick='javascript:changeStyle("yui-t7");' title='yui-t7'>Printer friendly version</a>
</div>
<script language='javascript' type='text/javascript'>
function changeStyle(style) {
obj = document.getElementById('doc');
if (typeof style == "string") obj.className = style;
}
</script>
<b:include name='quickedit'/>
</b:includable>
</b:widget>
That's it! Noticed how JavaScript code can live together with Beta code is such a peaceful and natural manner.
This picture shows the links are placed at an unintrusive location (the very bottom of the page) in normal style,

and in printer frienly version,
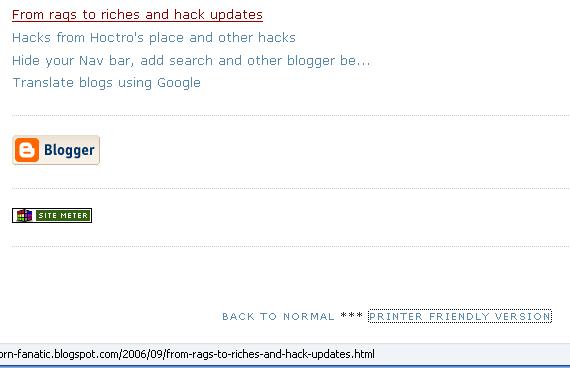
This hack shows that if not for anything else, the ability to have a printer-friendly version should worth your time installing my previous CSS Grid hack.
I would like to thank Ramani again for his unselfishness in showing his "secrets" to others, so that we could all push the new Blogger Beta to new heights.
Cheers,
Hoctro (9/14/2006)
Blog: http://hoctro.blogspot.com/
Update: (October 12, 06)
Here is the code I use for showing the hack on my front page. Feel free to use it on your site if you like it.
<b:widget id='HTML2' locked='false' title='Try this h a c k out' type='HTML'>
<b:includable id='main'>
<!-- only display title if it's non-empty -->
<b:if cond='data:title != ""'>
<h2 class='title'><data:title/></h2>
</b:if>
<a href='javascript:void' onclick='javascript:changeStyle("yui-t1");' title='yui-t1'>
<img class='img_cls' src='http://photos1.blogger.com/blogger2/3768/593528219081732/400/t1.jpg'/></a>
<a href='javascript:void' onclick='javascript:changeStyle("yui-t2");' title='yui-t2'>
<img class='img_cls' src='http://photos1.blogger.com/blogger2/3768/593528219081732/400/t2.jpg'/></a>
<a href='javascript:void' onclick='javascript:changeStyle("yui-t3");' title='yui-t3'>
<img class='img_cls' src='http://photos1.blogger.com/blogger2/3768/593528219081732/400/t3.jpg'/></a>
<a href='javascript:void' onclick='javascript:changeStyle("yui-t4");' title='yui-t4'>
<img class='img_cls' src='http://photos1.blogger.com/blogger2/3768/593528219081732/400/t4.jpg'/></a>
<a href='javascript:void' onclick='javascript:changeStyle("yui-t5");' title='yui-t5'>
<img class='img_cls' src='http://photos1.blogger.com/blogger2/3768/593528219081732/400/t5.jpg'/></a>
<a href='javascript:void' onclick='javascript:changeStyle("yui-t6");' title='yui-t6'>
<img class='img_cls' src='http://photos1.blogger.com/blogger2/3768/593528219081732/400/t6.jpg'/></a>
<a href='javascript:void' onclick='javascript:changeStyle("yui-t7");' title='yui-t7'>
<img class='img_cls' src='http://photos1.blogger.com/blogger2/3768/593528219081732/400/t7.jpg'/></a>
<script language='javascript' type='text/javascript'>
function changeStyle(style) {
obj = document.getElementById('doc');
if (typeof style == "string") obj.className = style;
}
</script>
<b:include name='quickedit'/>
</b:includable>
</b:widget>